For some reason I don’t tend to make lots of earrings, although I have a little splurg now and again and I make about 10 pairs one after the other. My main problems however are usually forgetting to photograph them and log them and then storing, packaging and displaying them. So after photographing them all for a change, I decided to tackle the problem of packaging and storage!
In the past I have used an A4 sheet of white 210gsm card, cut into 5cm x 7cm pieces (this size works for me), I then pierce 2 holes near the top with a needle and hang the earrings through the holes and attach those rubber backs to secure. Sometimes I have ink-stamped images on the cards, I have also printed out and stuck my logo on them, but mostly I leave them blank. I’ve even tried using buff luggage labels and punching fancy edging on the cards. But none of them looked very professional and I find the card is just not strong enough!
Today though, this is what I came up with.
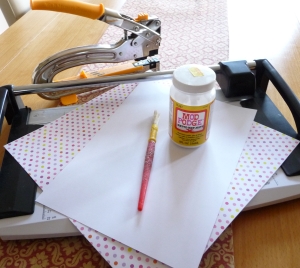
I used:
210gsm A4 White card
Dovecraft Back to Basics 12 x 12 150gsm Card
Mod Podge & Paint brush
Crop-A-dile for making eye holes
Paper Trimmer
Method
- Take a sheet of the A4 white card, apply mod podge all over one side and then place it carefully onto the back of a sheet of the Dovecraft 150gsm Card (I liked the dotty design), smooth it down to ensure there are no air pockets etc. Then allow to dry.
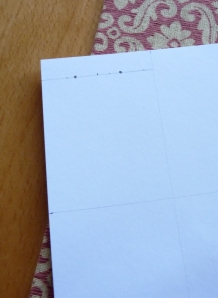
- Once dried, place the paper in the landscape position and with a pencil mark out the white card at 5cm intervals across the top and 7cm intervals down the sides, then very lightly joined up the marks. This will give you 15 cards of 5cm x 7cm and three 4.5cm x 7cm cards, you can still use the these slightly smaller cards, waste not want not!
- Use a Paper Trimmer or Scissors to cut along all the lines. (I’m useless at cutting straight lines, even with the paper trimmer!)
- Next you need to make the holes for the earrings. I used a Crop-A-dile, but you can use a needle if you want to. First mark each of the cards 1cm down from the top edge, then mark the point 1.5cm in from each side and this is where you punch the holes.
- I have a free stamp I received from Vistaprint with ‘Georgia P Designs’ on it, so I used this on the bottom of each card, but you could also use a label or leave it blank.
Using the 2 cards stuck together really made them firm and as I used basic patterned card they didn’t need anything else doing to them.
My next task was how to store the finished earrings, without them getting tangled etc.
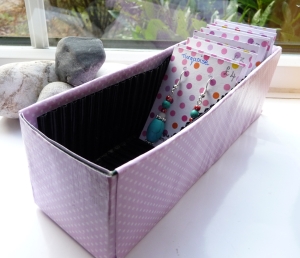
Now don’t laugh but I had just finished a box of After Eight chocolates (left from Christmas) and looking at the box it looked about the same width as the earring cards, (slightly wider) and it had a very useful ridged insert. I placed one of the earring cards in it and it fitted perfectly.
The only problem was I didn’t really want everyone to see I was using an After Eight box, so I decided to turn down and stick all the edges, including the box lid to give it a bit more strength and then covered it with some more of the Dovecraft Back to basics paper (as above) using mod podge. I then put the ridge insert back in the box and Eh Presto! Useful upright storage for earrings!
What do you think?
If you have some good ideas for packaging earrings and storing them, I would love to hear from you?
Linda x


Wonderful idea and beautiful earrings!!! 🙂
Thank you. Lx
That looks a neat and tidy solution.
Thanks. Lx
l think it displays them perfectly and love the earings
Thanks, I just need to buy more After eight mints now, so I can make more boxes, (any excuse to eat chocolate!). Lx
Hmmm, still eating up chocolates are we? I’ve just had some brought out by my in-laws so have been tucking in myself!
Your earring cards are brilliant, very noticeable and funky (like the earrings too). Did you get the free stamp when you ordered business cards from Vistaprint? Have been considering them for years now but always find an excuse to make my own. Cath x
I know I confess, but they are all gone now though, so back to being good!
Yes the stamp was free from Vistaprint when I ordered some business cards. Initially I paid about £20 (with postage) for 500 business cards, but then they start sending you offers, like 500 more for £5 or even free sometimes. I’ve also had a free mug, free T shirt, free postcards, free photo album, free sign, free cotton bags and free keyrings. So I haven’t done too bad out of them, lol! Linda x
That sounds like a good deal. Did you wear the T-Shirt yet? My problem would be deciding which design to have – I’ve just been fiddling on the free business card websites (since reading your post) as I have zero business cards left – but have come up with nothing worth printing, then I got fed up having spent so much time messing around! Will try again tomorrow!
PS. does anyone know a good business card designer online which is free? Please help!
No, not yet, I did try to get my son to wear it, but he was having none of it.
On Vistaprint, I just went with the design it yourself option and uploaded my own logo, although they do have lots of templates. But on my first attempt I uploaded my logo, added words, used the back with coloured text and a photo and when I went to price it, they came out at about £60. So I went back and started deleting/changing things again, ie changed from colour to black font, deleted a photo and that’s how I ended up with £20. It is worth playing around with it. I think you can do the same on Moo and some people say they are better quality http://uk.moo.com/ but a little bit more expensive. You can use both these sites to design your own card for free, you just have to pay for printing. I think your logo would look great on a white business card and you don’t really need to do much else, apart from add your contact info.
I did have a go at designing a business card for TCN on Vistaprint and I used one of their standard layouts but uploaded the TCN logo and it looked quite good. I didn’t order them though, I just saved the design as a picture and then printed my own out on card, naughty I know, but it did the job. Lx