How you present your crafts when you have made them is extremely important, especially if you are trying to sell them on-line.
I know my jewellery photos are no way perfect. But with the limited resources I have I do my best and I think sometimes they turn out OK, the main point is I spend some time and effort ‘trying’ to get them right. I would love to be able to invest in an expensive camera, good photo editing software, a light box etc, but I just don’t have the funds, so I make the best with what I have. A well-lit window sill, a reasonable camera, some basic photo editing software that came with my PC for cropping etc and I currently use Microsoft Powerpoint to do simple photo collages! Basically no more than what most people have.
So why oh why, do I see so many poor quality photos, especially on Facebook, of crafts people are trying to sell. I find it so frustrating.
If you don’t already know I also run another Blog and Facebook Page called ‘The Crafty Network’. Last year I ran quite a few craft challenges and showcases, so you would think it would be very important for people to send me a decent photograph of their entries. Many times I found myself having to spend time re-editing the photos people sent me. However, this year I am putting my foot down. As part of each Monthly Craft Challenge I will be running I am asking for people to THINK about how they photograph their entries, to put the same amount of creativity and effort into ‘presenting’ their item as they have used to make it. My aim is not to criticise but to help, better photos = more sales and votes in the challenges!
I also want to say to people it’s not that difficult.
Lighting for instance,
There is nothing better than natural daylight, so like me if you are photographing small items and you have a window sill, use that. I cover it with gloss photographic paper and use some beach pebbles as background (but this isn’t necessary). Also, a day without bright sunlight is best as the sun tends to cast shadows. I get close enough to the item without using zoom, but ensuring it is not out of focus, to err on the side of caution move back and then take the photo, you can always crop it later. I’ve also found a feature on my camera which is a ‘back light’ which really does make a difference. I normally take about 4-8 photos of each piece from different angles, then choose which I like best after uploading to the PC.
Editing
I would love to have photoshop, but I don’t, so I use a very basic photo editing software that came with my PC, I don’t particularly like it as I find it very confusing but the main features I do use are; rotation ie. changing a photo from landscape to portrait. Image cropping so I can cut out unneccessary space and sometimes I use the brightness and contrast function if the photo is quite dark. I am sure there is a lot more I could do with the software but every time I try to have a play it goes wrong and mostly I don’t understand it!!
Producing a collage? ie. combining more than one photo in a frame.
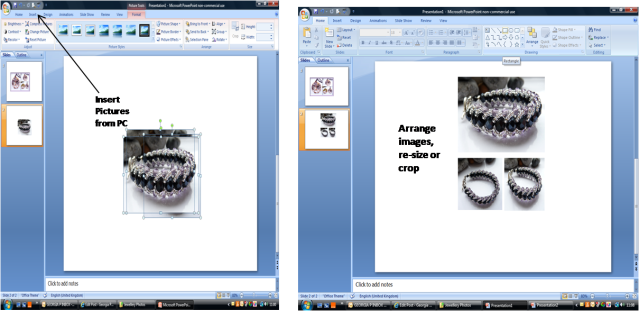
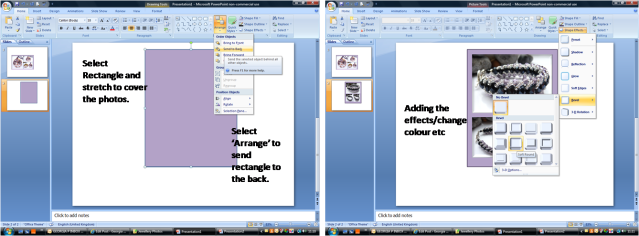
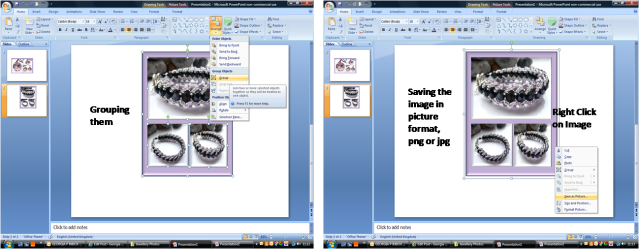
I currently use Powerpoint, because for me it is easy.
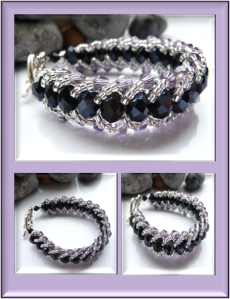
All I do is open a blank powerpoint slide, insert the photos I want to use, size/crop them and put them in an arrangement, I also like adding shape effects, I’ve been choosing bevel recently. I choose/size a box to frame them all, which I put to the back and then choose a colour/effect for the box. You can also add text if you want to. When I am happy with the arrangement I select everything and arrange them in a group, then I right-click to save as a picture, which you can format as a jpg or png file.
My Blogging friend Cath from Lizzie Rose Jewellery, recently wrote a blog post about PicMonkey see HERE. Which is a free on-line photo editing site. This gives you access to their basic features, but you can also pay a monthly or yearly fee to become a member which enables you to use many more features. I have had a quick go with it and it is very easy to use, my only issue was getting my images to fit inside the frames.
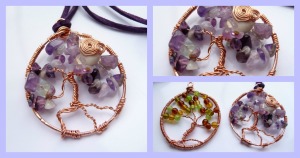
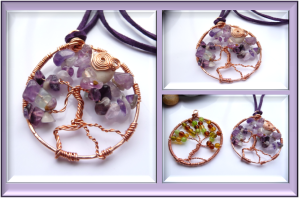
The same images, but one done in PicMonkey and the other done in Powerpoint:
There are many other packages you can download for free or buy on-line, ie Smilebox, I also found Photo Collage for iphone/ipad.
I am no way an expert on taking photos, a pure amateur so if you can share any tips regarding taking photos of your crafts and also if you can recommend any photo editing software that is easy to use I would love to hear from you?
Thanks & take care.
Linda x

Hi Linda, I tried pic monkey but I didn’t get on with it, I also have gimp, a lot of people use it but I find it far too complicated for my ‘ickle braincell so I use a free download called PhotoScape. I find it really simple for my needs.
Jan x
Thanks Jan, I will take a look at it, I’m the same I don’t like things that are not self explanatory or take too much effort. Lx
Hi Linda, thanks for the brief lowdown on the different types of editing programmes. I have no idea how to use Powerpoint even though my kids are experts! I downloaded Gimp last year which I agree is too much information and it took up a lot of space on my small laptop! Will have a look into Photoscape too. Bye for now! Cath x